顯示具有 Software 標籤的文章。 顯示所有文章

9.24.2025

SFC模擬器-漢化遊戲亂碼問題(大部份轉錄)

SFC模擬器-漢化遊戲亂碼問題

若照正常的SFC程式設計來說....

對於漢化後的遊戲,其記憶體所能夠並呈現的文本量是遠遠不夠的!

所以漢化版採用了一項特別的技術「強刷顯存」來支援更多的漢字顯示

雖然SFC硬體本身不支援這種操作

但早期的模擬器們並沒有加入相關限制

全力模擬每一行程式碼的所呈現效果

(大概是出於運行效率的考慮吧?畢竟發行版本的遊戲不太可能加入這種本應無效的操作)

所以早期模擬器也就能夠順利運行各式各樣的漢化Rom

不過隨著電腦性能的提升和SFC模擬水準的進步

精確的再現實體機性能成為了各大SFC模擬器的最終目標

於是這項硬體本身不允許的操作理所當然的被過濾掉了....

這也就是造成我們所看到的亂碼問題最大原因!


時至今日,幾乎所有還在維護的SFC模擬器都引入了這個限制

所幸有些模擬器已經提供了高級選項「 BlockInvalidVRAMAccess」

可以手動關閉這個過濾的選項

因此使用上需要留意一下。


Snex9x 的情況


在選項中找到[設置]-[系統]

找到[限制無效的VRAM進程]並將之切換到[關閉]

以記事本打開snes9x.conf 或 snes9x.cfg

找出[Settings]

BlockInvalidVRAMAccess並改成BlockInvalidVRAMAccess=FALSE

存檔後重啟模擬器即可

RetroArch的情況

在玩 SFC 遊戲時,按下 Select + X(或你設定的 Hotkey) → 進入 Quick Menu → Core Options -> Emulation Hacks,找到 “Block Invalid VRAM Access” 選項,把它設 OFF(或 FALSE)
Save States或是:
修改後可以在 Overrides → 儲存 Core Overrides(儲存給這個核心)


5.01.2023

如何在Windows 11 or 10遊玩SafeDisc保護的遊戲(純轉載沒試過)

 Ref:Microsoft Safedisc - Microsoft Community

Microsoft didn't make SafeDisc, it was created by the Rovi Corporation. You can learn more at: How to Play Games with SafeDisc or SecureRom DRM on Windows 10

is to use the one stop option - Driver Signature Enforcement Overrider 1.3b

I've never used this, but it does apparently work. However, I've been using noCD fix\hacks since I started using PC for games in 2004.


The easiest way to do this is to employ the Driver Signature Enforcement Overrider tool, which, when run as administrator, enables you to sign a previously untrusted file.

muo-gaming-w10-retro-drm-admin

Once you've acquired a copy of the SECDRV.SYS file (either by downloading it or copying it from the c:\windows\system32\drivers directory on Windows Vista, 7 or 8, and saving it to the same location in Windows 10), run the DSEO tool by right-clicking dseo13b.exe and selecting Run as administrator.

muo-gaming-w10-retro-drm-sign

Work through the subsequent dialogue boxes until you see the main menu and select Enable Test Mode then click Next.

This time, select Sign a System File, and browse to the SECDRV.SYS file in c:\windows\system32\drivers. Click OK, and wait while the driver is signed. You'll see the following message:

muo-gaming-w10-retro-drm-complete

Once you have followed the instructions to restart and then run DSEO again with Test Mode enabled, the driver should now be loaded by the game you've had trouble with, restoring your ability to play it.

(Should you be using Windows 10 Technical Preview, enabling Test Mode will result in a watermark appearing on your display. This can be removed using the Remove Watermark option in DSEO.)

Ref:NGOHQ.com

How to Play Games with SafeDisc or SecureRom DRM on Windows 10 (makeuseof.com)

12.29.2021

Macos Safari search 被redirect到Yahoo 解法

    經實際測試,Malwarebytes有効。 


  1. Download Malwarebytes Free.

    You can download Malwarebytes for Mac by clicking the link below.

    MALWAREBYTES FOR MAC DOWNLOAD LINK
    (The above link will open a new page from where you can download Malwarebytes for Mac)
  2. Double-click on the Malwarebytes setup file.

    When Malwarebytes has finished downloading, double-click on the setup file to install Malwarebytes on your computer. In most cases, downloaded files are saved to the Downloads folder.

    Double-click on setup file to install Malwarebytes

  3. Follow the on-screen prompts to install Malwarebytes.

    When the Malwarebytes installation begins, you will see the Malwarebytes for Mac Installer which will guide you through the installation process. Click “Continue“, then keep following the prompts in order to continue with the installation process.

    Click Continue to install Malwarebytes for Mac

    Click again on Continue to install Malwarebytes for Mac for Mac

    Click Install to install Malwarebytes on Mac

    When your Malwarebytes installation completes, the program opens to the Welcome to Malwarebytes screen. Click the “Get started” button.

  4. Select “Personal Computer” or “Work Computer”.

    The Malwarebytes Welcome screen will first ask you on what type of computer are you installing this program, click either Personal Computer or Work Computer.
    Select Personal Computer or Work Computer mac

  5. Select “Use Malwarebytes Free”.

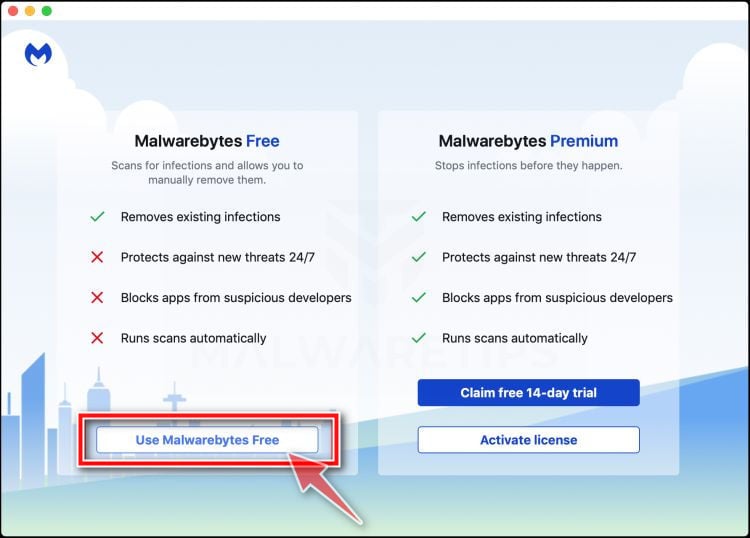
    You’ll be then prompted to select between the Malwarebytes Free and the Premium version. The Malwarebytes Premium edition includes preventative tools like real-time scanning and ransomware protection, however, we will use the Free version to clean up the computer.
    Click on “Use Malwarebytes Free“.
    Click on Use Malwarebytes Free Mac

  6. Click on “Scan”.

    To scan your computer with Malwarebytes, click on the “Scan” button. Malwarebytes will automatically update the antivirus database and start scanning your computer for Search.surfharvest.xyz malware.
    Click on Scan button to start a system scan Mac

  7. Wait for the Malwarebytes scan to complete.

    Malwarebytes will scan your computer for the Search.surfharvest.xyz browser hijacker and other malicious programs. This process can take a few minutes, so we suggest you do something else and periodically check on the status of the scan to see when it is finished.
    Wait for Malwarebytes for Mac to scan for Search.surfharvest.xyz browser hijacker

  8. Click on “Quarantine”.

    When the scan has completed, you will be presented with a screen showing the malware infections that Malwarebytes has detected. To remove the Search.surfharvest.xyz malware that Malwarebytes has found, click on the “Quarantine” button.
    Review the malicious programs and click on Quarantine Search.surfharvest.xyz browser hijacker

  9. Restart computer.

    Malwarebytes will now remove all the malicious files that it has found. To complete the malware removal process, Malwarebytes may ask you to restart your computer.
    Malwarebytes For Mac requesting to restart computer
    When the malware removal process is complete, you can close Malwarebytes and continue with the rest of the instructions.

8.08.2021

[轉貼] windows-也能-airdrop-無線-wifi-與-iphone-ipad-互傳分享照片、影片


【教學】Windows 也能 AirDrop 無線 WiFi 與 iPhone / iPad 互傳分享照片、影片與檔案

想要在 iPhone、iPad 和 Windows 作業系統之間分享傳輸資料,通常需要使用連接線才能傳輸,那萬一沒有連接線時該怎麼辦?

其實現在的 iOS 和 iPadOS 都已支援 SMB 網路傳輸協定,只要在同一個 WiFi 網域下,經過簡單設定就能透過無線網路傳輸照片、影片和檔案,不需要安裝使用任何軟體,也不用擔心受「線」,就能實現類似 AirDrop 的功能。

在 Windows 設定開啟 SMB 共用檔案資料夾

第一步

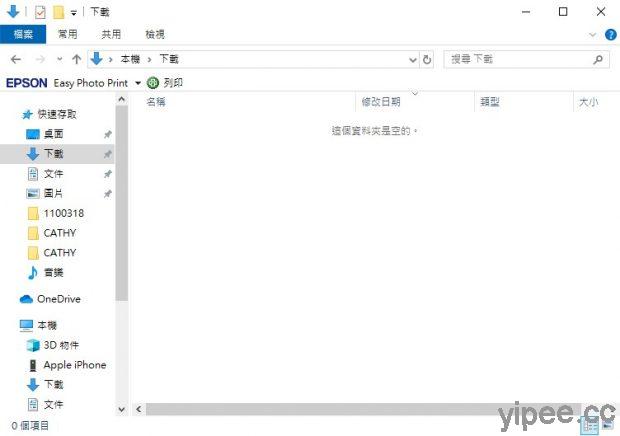
首先在 Windows 電腦上選擇要與 iPhone 或 iPad 分享檔案的資料夾,使用者可以依照自己的喜好開啟建立及命名資料夾。

不過,在這次示範教學裡,直接使用「下載」資料夾進行設定。

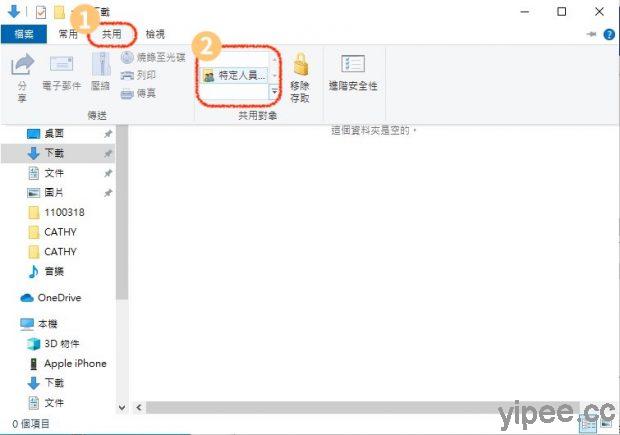
在資料夾上方功能列有個「共用」功能,點選「特定人員」功能。

第二步

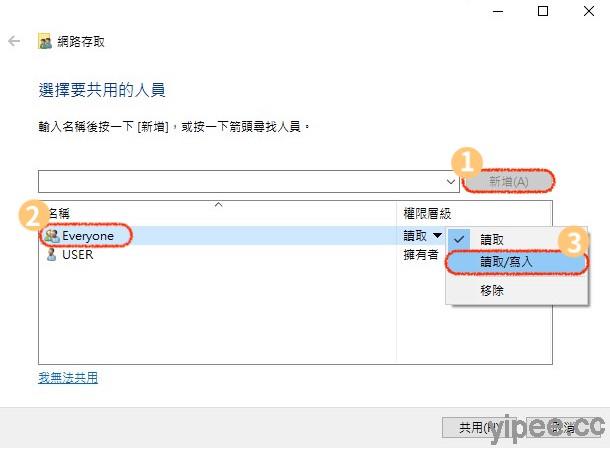
螢幕會跳出「網路存取」視窗,中間欄位「新增」加入「Everyone」所有人選項,並且將權限層級改為「讀取/寫入」,最後按下「共用」

第三步

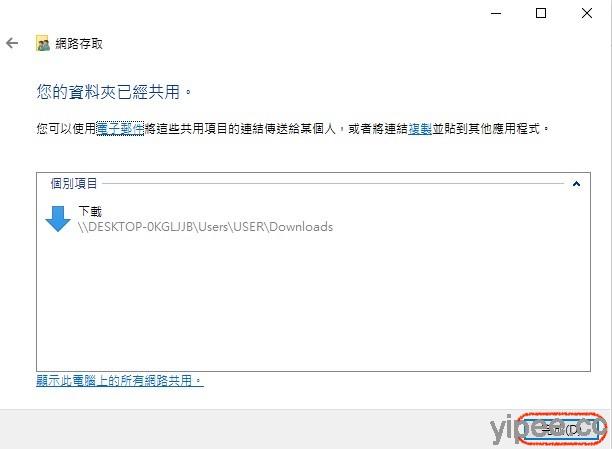
點擊「完成」,就完成共用資料夾設定了。

取得分享 IP 位置、帳號和密碼

設定好 SMB 共用資料夾之後,要來確認 Windows 和 iOS / iPadOS 裝置都在同一個 WiFi :。

第一步

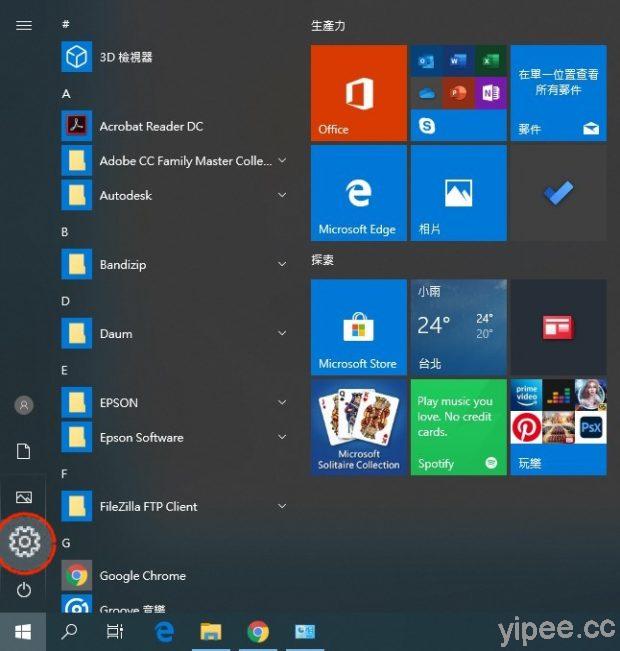
打開 Windows 作業系統的「開始」按鈕,點擊「設定」圖示。

第二步

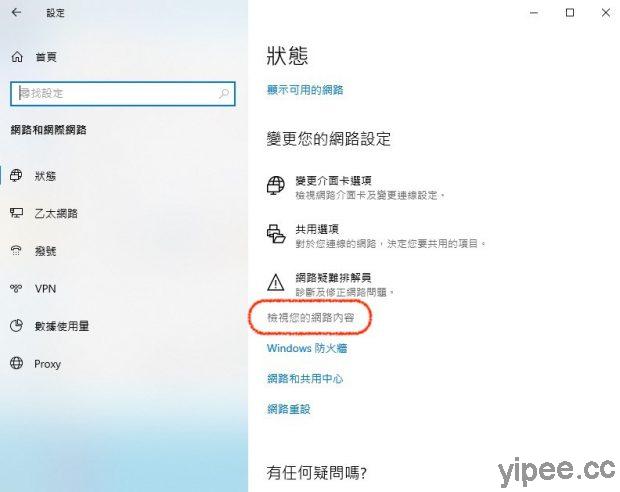
找到「網路和網際網路」設定,在「狀態」設備點擊「檢視您的網路內容」

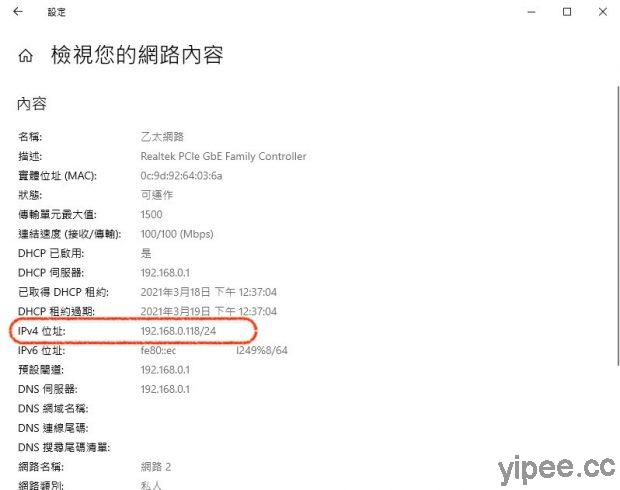
在網路內容中,找到「IPv4 位址」,記下這組位址,它就是 Windows 系統目前使用的網路。

想要找到 IP 位址除了從設定查詢之外,還可以在「命令提示字元」輸入「ipconfig」並按下 Enter 鍵執行,就會顯示 IPv4 位址。

iPhone、iPad 設定共用資料夾

第一步

在 iPhone 或 iPad 主畫面點擊「Files 檔案」App。

第二步

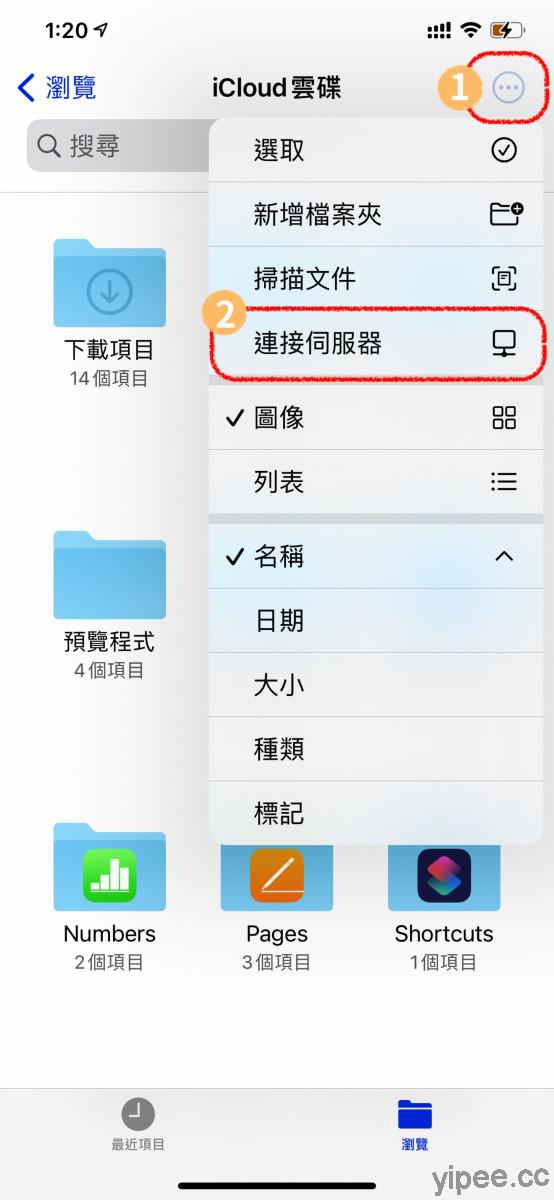
點擊右上方「≡」選項,點擊「連接伺服器」

第二步

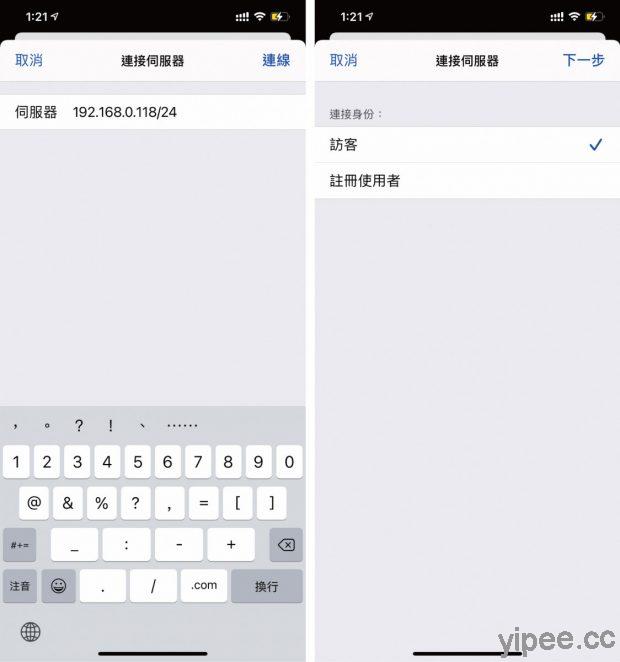
在伺服器欄位輸入先前查到的「 IPv4 位址」,舉例像前面查到的是「192.168.0.118/24」,就把它全部輸入進去,再按右上方「連線」

沒有設定密碼的話,直接選擇「訪客」就可以囉!如果有設定開機密碼的話才要選擇註冊使用者,設定完成之後再按「下一步」就能連上 Windows 資料夾。

第三步

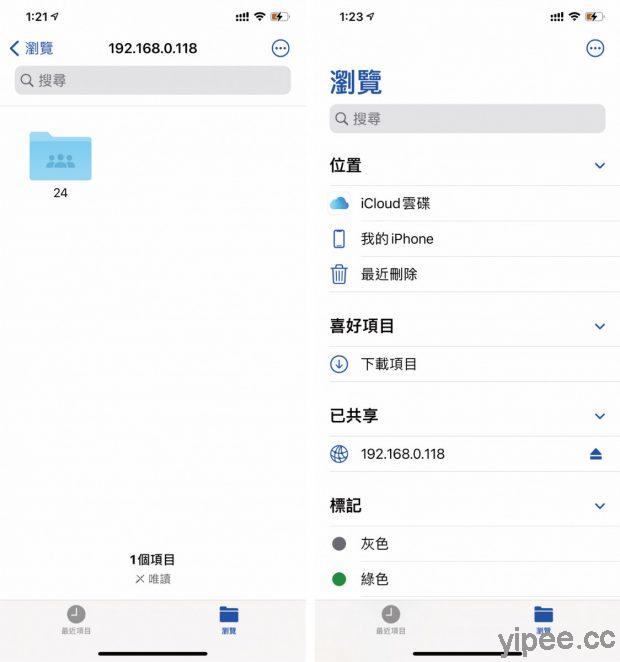
這樣設定完成之後,在「檔案 App」就會出現剛剛設定好的共享資料夾囉!而且在瀏覽清單裡,也會看到 SMB 共享資料夾位址,點進去就會出現 Windows 分享的檔案。

第四步

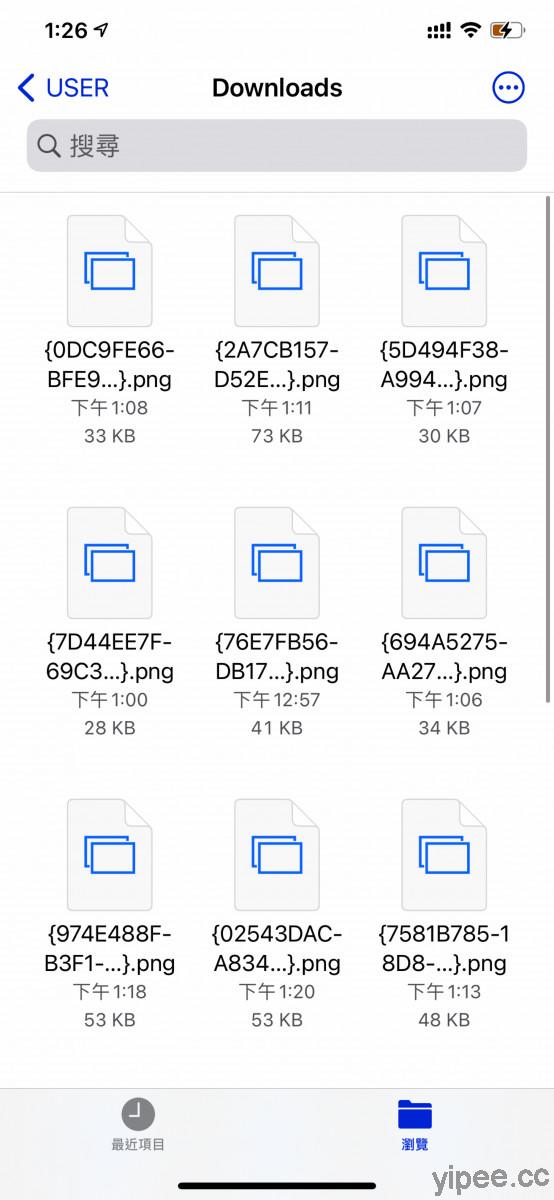
上圖就是原本上傳到 Windows 資料夾的檔案,我們打開 iPhone 檔案 App 的共享資料夾也能看到圖片。另外,也可以把 iPhone 的照片、資料藉由共享資料夾上傳到 Windows。

最重要的是,共享資料夾只要設定一次,以後就可以一直使用囉!最重要的是,其實整個設定操作只要幾分鐘就能完成,相當簡單!有需要的朋友們可以試試喔!

8.03.2018

嘸蝦米輸入法的灰色免費方案 for Windows 10

簡單說就是rime + 無蝦米設定檔:
1. Download and install rime
2. Go to https://github.com/amoshyc/myliu and download all files
3. 將 repo 中除了 README.md 外的所有檔案放至C:\Program Files (x86)\Rime\weasel-0.11.1\data 中。
(Linux 設定法,可參考https://amoshyc.github.io/blog/2018/install-liu-with-rime.html)
4. 在右下角rime 按滑鼠右鍵打開選單 -> 輸入法設定 -> 勾選 嘸蝦米 -> 中 -> 中
5. Ctrl + ` 切換輸入法

舊的Windows可參考:

嘸蝦米輸入法的三個灰色免費方案 for Windows


9.07.2015

1.24.2015

6.01.2014

How to Add "Open with Notepad" to Right-Click (轉貼)

同理可應用到Notepad++,
參:http://www.instructables.com/id/How-to-Add-Open-with-Notepad-to-Right-Click/

How to Add "Open with Notepad" to Right-Click

I personally hate to use "open with" due to the time, even if its only a few seconds, and having to then remember where exactly a certain program is located in my directory.

This will show you how to add ANY program to the Right-Click (Context Menu for all of your Files).

It's Easy, you cant screw it up, and it saves a bunch of time and hassle.

Since we will be dealing with regedit, and not everyone is familiar with it, i will be breaking down the steps to very simple, easy, and concise steps that anyone can follow.

 
Remove these adsRemove these ads by Signing Up

Step 1: First

Go to Start and open Run

Step 2: Second

Type in regedit.exe and click OK.

Step 3: Third

Find and expand (click on the + to the left) HKEY_CLASSES_ROOT

Step 4: Fourth

Browse down to the * key and expand it (click on the + to the left of the folder)

Step 5: Fifth

Find the key shell

Step 6: Sixth

Right Click on the key shell, go to New and create a new Key

Step 7: Seventh

Name that Key "Open with Notepad"

Right click on the Open with Notepad key and make another Key

Step 8: Eighth

Name the new Key "command"

Step 9: Ninth

Click on the command key and double click on 'the (Default) value

Step 10: Tenth

Type in "notepad.exe %1" There is a space between "notepad.exe" and "%1"

Click on OK

Step 11: Finished

Close regedit and marvel at the ease of opening text documents!

Effects should occur immediately.

Remember:

This can be used for any and all programs.

In case you are just completely confused, use the following zip file (which also comes with a handy uninstall) that will change your regedit key accordingly)

Download OpenWithNotepad registry hack

8.06.2010

Ren'Py 6.11.0 超新手的圖形化時鐘範例(in windows)

Ren'Py可以加入圖形化時鐘,
可參考:Adding a simple and somewhat functioning Analog Clock(英文)
不過不小修改這個範例 ,直接用這個code在Ren'Py 6.11.0卻不能執行。
所以我把修改後,可以在Ren'Py 6.11.0下執行的code公開,
主要是renpy.image(name,image)需要兩個參數,
其它只是一些小修改。


#script.rpy code 
init python: 
    clock = False
    minutes = 540
    renpy.image("clock","Clock.png") # Short Clockhand
    renpy.image("clock_1","Clock_1.png") # Long Clockhand
    renpy.image("clock_2","Clock_2.png") # Clockface
  
    def Clock():
        if clock: # if False - clock is hide
            ui.at(Position(xpos=150, ypos=140, xanchor="center", yanchor="center"))
            ui.add("clock_2")
            # xalign and yalign can be replaced by xpos and ypos - position where the center of the clock should be
            # this segment is the one responsible for the clockface

            ui.at(Position(xpos=150, ypos=140, xanchor="center", yanchor="center"))
            ui.at(RotoZoom((minutes*6), (minutes*6), 5.0, 1, 1, 1, rot_bounce= False, rot_anim_timebase=False, opaque=False), )
            ui.add("clock")
            # this segment is the one responsible for the short clock hand.

            ui.at(Position(xpos=150, ypos=140, xanchor="center", yanchor="center"))
            ui.at(RotoZoom ((minutes*0.5), (minutes*0.5), 5.0, 1, 1, 1, rot_bounce= False, rot_anim_timebase=False, opaque=False))
            ui.add("clock_1")
            # this segment is the one responsible for the long clock hand.

    config.overlay_functions.append(Clock)


init:
label start:

    $ clock = True
    with dissolve


#End of script.rpy 

另外就是Clock.png, Clock_1.png及Clock_2.png請放在
../renpy-6.11.0/common/
注意圖形檔案及檔名不要錯了哦。

8.01.2010

Ren'Py 6.11.0 超新手中文顯示簡介 (in windows)

Ren'Py是一個免費跨平台的AVG(視覺小說)製作軟体,
介面沒有商業軟体的戀愛遊戲製作大師二,來得人性化,
不過戀二已經是很久以前的軟体了,而且是商業軟体,
所以除了人性化外,很多方面不如Ren'Py,
而Ren'Py最大的特點是以英文為主,
所以如何中文顯示,就成為新手面臨的一大課題,
網路上有許多中文顯示的文件,
不過大多數都已經過舊,
新版的Ren'Py顯示中文,其實很簡單:
1. (Optional)首先下載開源的中文字型(如文泉驛中文字体)
2. 將字型放到程式下的common目錄下。
3. 建一project,去修改 遊戲所在資料夾中,option.rpy

style.default.font = "fontname.ttf"


這邊fontname.ttf即是中文字型檔檔名
(參:http://www.renpy.org/wiki/renpy/doc/FAQ#How_do_I_change_the_default_font.3F)

此時,你Select Project且Launch之後,成功的話,
就可以看到中文了。
額外的中文修改(可能有其用途,不清楚)
參考:http://www.renpy.org/wiki/renpy/doc/cookbook/Chinese_and_Japanese

Good Luck!

7.30.2010

嘸蝦米輸入法的三個灰色免費方案 for Windows

首先無蝦米的專利權已經消滅
所以用免費的其它程式來實作無蝦米輸入法,
應該是不夠成侵權的。
目前就我所知,就有三個方案,各有優缺點。

方案一:偽.蝦米
主要優點:免安裝
缺點:
1. 從2008/9/14到現在2010/7/31沒在更新
2. 送字慢
3. 有時候程式無法自動送字到某些視窗,需設定一下才行
4. 沒整合進Windows輸入法中(portable)

方案二:Yahoo!奇摩輸入法 + 糖果無蝦米
主要優點:
1. 送字較偽.蝦米穩
2. 與Windows輸入法整合佳
主要缺點:
不支援按'V'鍵選第二個字

參:http://candy.twgogo.org/2010/06/yahoo-liu/

方案三:gcin + noseeing.gtab
主要優點:
1. 送字快且穩
主要缺點:
與一般Windows輸入法整合方式不同(耗資源),如按Ctrl + Shift不會切到別的輸入法,
而是在gcin中切換

9.20.2009

免費電腦象棋、圍棋軟体

      小學、國中時我常玩象棋,高中時,發生一件大事,就是世界西洋棋王卡斯帕羅夫輸給了IBM開發的超級電腦深藍。自此,我改下圍棋,並注意電腦象棋的發展。XieXie Master是我覺得棋力不錯的一個軟体,他的正式版棋力調強以後,有職業級的水準,我也從沒勝過正式版,近年來,XieXie Master也有出免費版,不過免費版我沒回手,就有在圖書館勝過電腦一場的紀錄。

      至於我的圍棋棋力,跟gnu go 3.8版差不多,最近一次跟gnugo 3.8下棋的紀錄,我持白子(後手), 電腦在glgo client下level調到最強,我輸了2.5分。建議圍棋初學者,可用glgo當作介面,並下載gnu go來玩哦。